


How to Apply Vinyl Decals to Caravans: A Step-by-Step Guide
Table of Contents
- How to Prepare a Caravan for Decals
- Tools for Applying Vinyl Decals
- How to Apply Vinyl Decals Wet or Dry
- Step-by-Step: Positioning and Applying Vinyl Decals to Caravans
- Handling Caravan-Specific Surfaces and Curves
- How to Stop Vinyl Decals Peeling
- Frequently Asked Questions
Last Updated: October 16, 2026
How to Prepare a Caravan for Decals
Knowing how to apply vinyl decals to caravans starts here: a clean, dry panel is the single biggest factor in whether a vinyl decal stays put for years or starts lifting within weeks. At Mega Sticker Store, we see more failed installs traced back to surface prep than to the vinyl itself. Preparing a caravan for decals takes about 20 minutes per panel and costs very little. Skip it, and you will pay for it later.
Dust, silicone polish and road film all sit between the adhesive and your paint. The vinyl sticks to the grime, not the panel.
Cleaning the Panel: Sugar Soap, Alcohol and Tack Cloth
Start with sugar soap and warm water to strip away dirt and old polish. Rinse well, then let the panel dry completely.
Next, wipe the area with isopropyl alcohol on a clean cloth. This removes oils and any soap residue the rinse left behind.
Finish with a tack cloth to pick up lint and fine dust. Do not touch the panel with bare hands after this step. Your skin leaves oil that weakens adhesion.
- Sugar soap: cuts grease and old wax
- Isopropyl alcohol: removes oils and residue
- Tack cloth: lifts final dust and lint
- Clean microfibre cloths: one per stage, never reused
Choosing a Dry, Shaded Application Area
Vinyl behaves best between roughly 18°C and 25°C. Work in shade, not direct sun. Hot panels make vinyl stretch and trap air.
Pick a still day. Wind blows dust onto your freshly cleaned surface and makes transfer tape hard to control.
A garage or carport is ideal. If you must work outside, aim for early morning or late afternoon.
Tools for Applying Vinyl Decals
A caravan decal job is won or lost on the bench before you touch the panel. Gather everything first, because once the backing paper is peeled you cannot stop to hunt for a squeegee. The list below covers a typical 1-2 panel job and should take about 10 minutes to assemble.
Core tools
- Felt-edge squeegee, the workhorse. The felt lip protects the vinyl face from scratches while the firm blade pushes air out. A 100 mm blade suits large stripes; a 50 mm blade reaches into tight corners and around rivets.
- Masking tape, low-tack painter's tape for hinge lines and dry-fit marks. Avoid cheap hardware tape; it leaves residue that contaminates the panel.
- Isopropyl alcohol (IPA), 70% or higher, in a spray bottle or on a clean cloth. This is the final wipe before application.
- Sugar soap, for the first wash. It strips road film, silicone polish and old wax that IPA alone will not shift.
- Tack cloth, lifts lint and fine dust after the IPA wipe. Do not substitute a microfibre cloth here; microfibre can leave fibres behind.
- Clean microfibre cloths, one per stage (wash, IPA, final wipe). Never reuse a cloth that has touched the ground or a dirty panel.
- Sharp craft knife or pin, for pricking stubborn bubbles and making relief cuts on compound curves.
- Hair dryer, the safest heat source for warming edges, softening vinyl over rivets, and reactivating adhesive on a cool day. A heat gun on high will distort the film and is not recommended for beginners.
- Application fluid, a spray bottle of water with 2-3 drops of dish soap per 500 ml. Used for the wet method only.
- Measuring tape and pencil, for centring a decal and marking reference points. Mark lightly; a pencil line under a decal is visible through light-coloured vinyl.
Caravan-specific extras worth having

- Rivet brush or small stiff brush, for cleaning around rivets and seams where grime collects and a cloth cannot reach.
- Edge sealer pen, optional, but useful on decals that sit across a seam or near a wheel arch where water pools.
- Plastic razor blade, for lifting a misaligned edge without scratching paint or gelcoat.
- Step stool or platform, caravan panels are tall. Working off a ladder is unstable and leads to uneven squeegee pressure.
What you do not need
- A heat gun on high, it will warp vinyl and can damage gelcoat.
- Silicone-based polish or spray wax, it contaminates the panel and is a leading cause of early lifting.
- A squeegee with a hard plastic edge, it scratches the vinyl face and leaves visible drag marks.
If you are applying a large multi-piece kit, add a second squeegee so you always have a dry one while the other is being wiped clean. A spare roll of masking tape is also worth keeping within reach.
How to Apply Vinyl Decals Wet or Dry
Choosing between the wet and dry method is the decision most guides gloss over. It changes your whole approach.
The dry method means applying the decal straight onto the clean panel. It gives the strongest immediate bond and suits small decals, flat panels and simple shapes.
The wet method uses a spray of water and a few drops of dish soap. The slip lets you slide the decal into position and push out air easily. It suits large decals, multi-piece kits and curved caravan panels.
| Factor | Dry Method | Wet Method |
|---|---|---|
| Best for | Small, flat decals | Large or curved decals |
| Positioning | Fixed once down | Repositionable |
| Bubble removal | Harder | Easier |
| Drying time | Immediate | Needs hours to cure |
| Skill level | Beginner | Beginner to intermediate |
For a first attempt on a big caravan stripe, the wet method is far more forgiving.

Temperature, Weather and Curing Conditions
Vinyl needs time to cure. The adhesive reaches full strength over roughly 24 to 72 hours.
Keep the vehicle dry and out of direct sun during that window. Avoid washing the panel for at least 48 hours.
Cold weather slows the bond. Warm the panel and the vinyl gently with a hair dryer if the day is cool. Never use a heat gun on high, as it can distort the film.
Step-by-Step: Positioning and Applying Vinyl Decals to Caravans
Here is the full process for how to apply vinyl decals to caravans, from first mark to final peel.
Vinyl Applicators for Decals: Effortless Sticker Application Tool →
- Clean and dry the panel using the sugar soap, alcohol and tack cloth method.
- Dry-fit the decal and mark your position with masking tape.
- Tape a hinge line along one fixed edge or the centre.
- Peel back a small section of backing paper from the hinged edge.
- Press the exposed vinyl down and squeegee from the centre outward.
- Work along the decal, peeling and squeegeeing in sections.
- Push out any air bubbles as you go.
- Peel away the transfer tape at a low angle.
- Do a final check and re-press any lifted edges.
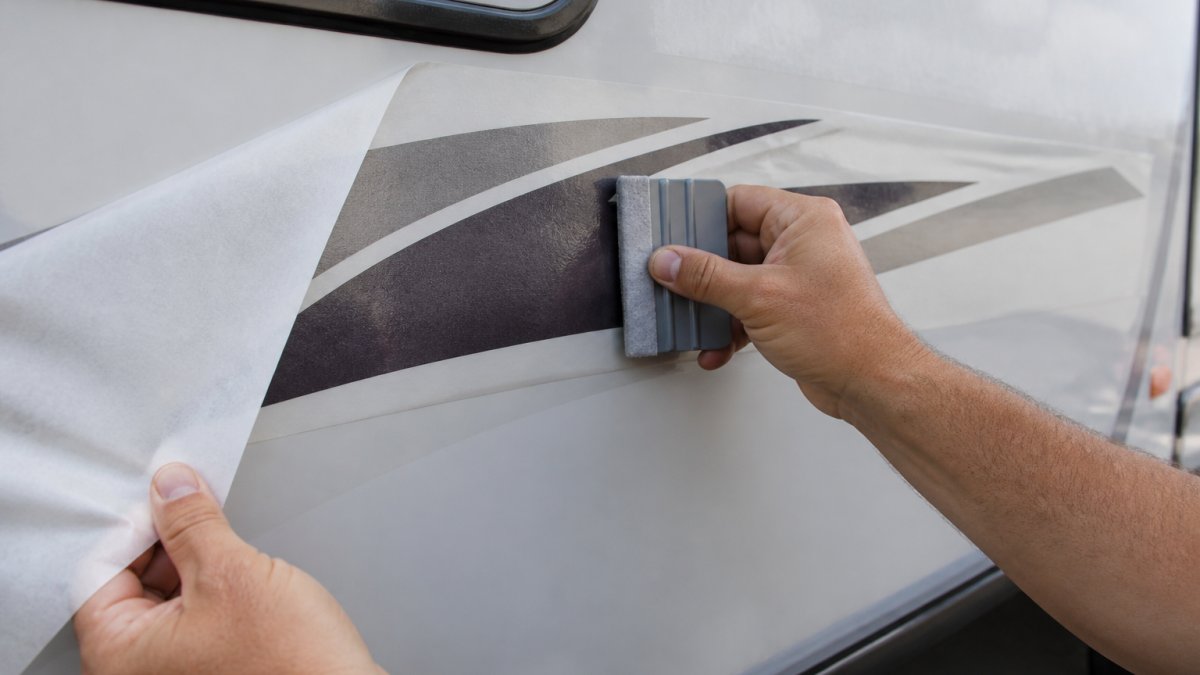
Peeling Backing Paper and Smoothing with a Squeegee
Peel the backing paper back slowly, a few centimetres at a time. Do not pull the whole sheet off at once. This keeps the vinyl from folding onto itself.
Hold the decal slightly off the panel and squeegee with firm, overlapping strokes. Start at the centre and work toward the edges. This pushes trapped air out rather than sealing it in.
Work in one direction. Back-and-forth strokes can trap air under the film.
Removing Transfer Tape and Doing a Final Check
Wait a few minutes after squeegeeing, then peel the transfer tape back at a low angle. Pull it slowly and close to the panel.
Check the whole decal for lifted edges, bubbles and creases. Press down any edge that has not fully bonded. Run the squeegee over the full decal one more time.
Handling Caravan-Specific Surfaces and Curves
Caravan panels are rarely flat. Most have gentle curves, rivets and seams, and that is where generic advice falls short.
For curved panels, apply in small sections and let the vinyl follow the shape. Do not stretch it hard to force a fit. Stretched vinyl springs back and lifts at the edges.
For rivets and seams, work the vinyl down around each one with your finger first. Then squeegee from the rivet outward. A small relief cut may be needed on tight compound curves.
- Ribbed or textured panels: use the wet method and press firmly into each groove
- Fibreglass panels: clean gently, as the surface scratches easily
- Painted metal: check for any loose paint before applying
- Multi-piece kits: align the first piece, then use it as your reference for the rest
How to Stop Vinyl Decals Peeling
Peeling almost always comes back to prep, temperature or edge pressure. Fix those three and most decals stay put.
The most common cause is a dirty or oily surface. If the panel was not cleaned properly, the adhesive never bonds to the paint.
The second cause is applying in cold or damp conditions. The adhesive cannot grip a cold panel.
The third is weak edge pressure. Edges take the most wind and weather, so they lift first. Press every edge down firmly with your squeegee at the end.
Using quality vehicle-grade vinyl helps too. Our Motorhome Caravan Stripe Decals 1400mm ($160.00) and Universal Vehicle Racing Stripe Decal Kit ($45.00) both use weatherproof, UV-resistant vinyl built for outdoor use.

Troubleshooting Bubbles, Lifting Edges and Misalignment
Bubbles: Prick the centre with a pin and press the air out toward the hole. For large bubbles, lift the nearest edge and re-squeegee.
Lifting edges: Warm the edge with a hair dryer, press it down, and hold for a few seconds. Clean under the lifted edge first if dirt has crept in.
Misalignment: If you used the wet method, slide the decal into place before it grabs.
Creases: Warm the crease and work it flat with the squeegee. If it will not lie flat, a small relief cut on a curve usually solves it.
| Problem | Likely Cause | Fix |
|---|---|---|
| Bubbles | Trapped air | Prick and press out |
| Lifting edges | Weak edge pressure | Warm and re-press |
| Misalignment | Set too early | Warm, peel, reposition |
| Creases | Stretching on curves | Warm and work flat |
Applying vinyl decals to caravans rewards patience more than speed, and prep matters more than technique.
Frequently Asked Questions
Do you apply vinyl decals wet or dry?
Both methods work, and the right choice depends on the decal size and surface. The dry method suits small decals and flat panels: peel, position and squeegee straight on. The wet method uses a light soapy water spray so you can slide large decals into place and push bubbles out before the adhesive grabs. For big caravan stripe kits, wet application gives you more working time and fewer creases.
How should you prepare a caravan surface before applying decals?
Wash the panel with sugar soap to strip road film and wax, rinse, then wipe with alcohol or a tack cloth to remove residue. The surface must be clean, dry and free of polish. Work in shade so the panel is cool to touch, because heat makes vinyl stretch and grab too fast. Skipping this step is the main reason decals lift at the edges within weeks.
How do you prevent bubbles and creases when applying a large decal?
Apply from a fixed edge or the centre outward, working in 100mm sections with a felt-edge squeegee and firm, overlapping strokes. Never stretch the vinyl to chase a bubble; lift the nearest corner, re-lay the section and squeegee again. Small bubbles often disappear within a few days as the adhesive cures in the sun. Creases need lifting and re-laying straight away.
How long should you wait before washing a caravan after applying decals?
Wait at least 48 hours, and ideally 72 hours in cooler weather, before washing. The adhesive needs time to bond fully to the panel. Avoid high-pressure water near decal edges for the first week, and skip wax or polish on the graphics for about a month. After that, normal washing is fine and actually helps the vinyl last longer.