


Vinyl Graphics for Motorhome Renovation: 2026 Guide
Table of Contents
- Why Vinyl Graphics Belong in Every Motorhome Renovation
- Vinyl Graphic Styles for a Motorhome Makeover
- Custom Motorhome Graphics: Design, Sizing and Proofing
- How to Remove Cracked Motorhome Graphics Before You Fit New Ones
- Motorhome Decal Replacement Cost: What to Budget
- Motorhome Replacement Decals: Choosing Vinyl Type and Lifespan
- DIY Installation vs Professional Fitting
- Conclusion
- Frequently Asked Questions
Last Updated: October 19, 2026
Why Vinyl Graphics Belong in Every Motorhome Renovation
Vinyl graphics are the fastest way to change how a motorhome looks without touching the paint, and they belong in every motorhome renovation because they cost a fraction of a respray, install in hours, and can be removed or updated later.
Here is the part most guides get wrong. They treat decals as an afterthought, something you stick on at the end once the real renovation is done.
A motorhome renovation is the process of restoring and updating a vehicle's interior, systems and exterior so it looks and functions like new. Vinyl graphics handle the exterior styling layer of that work: stripes, panel wraps, lettering and custom artwork applied as self-adhesive film.
Vinyl Graphic Styles for a Motorhome Makeover
Style choice comes down to three questions: how much of the panel you want to cover, how bold you want to go, and whether the design needs to work around windows, vents and curves. Most renovation projects land on stripes, a retro landscape kit, or a partial wrap.
Stripes, Pinstripes and Retro Landscape Kits
Stripes are the safest renovation choice because they modernise a dated vehicle without overwhelming it. A simple two-tone stripe running the length of the side panel reads as factory styling, and it hides minor panel imperfections.
Pinstripes suit older motorhomes that already have a classic shape. Thin lines add definition without competing with the vehicle's original lines.
Retro landscape kits, like our Earth-Tone Landscape Decal Kit for RVs, Vans, Campers & Trucks, take the flowing side-stripe style popular in the 1970s and 80s and rebuild it in modern waterproof, UV-resistant vinyl. These kits include coordinated pieces for left and right sides plus front and back, so the design wraps around the vehicle consistently.

Full-Panel Wraps and Personalised Stickers
Full-panel wraps cover large flat sections with printed artwork. Our Custom Motorhome Wrap Australia uses a durable 5-year vinyl with a glossy overlaminate, and it suits flat surfaces and slight curves. Expect to do some cutting around windows and doors, and note that it is priced per side.

Personalised stickers work for smaller touches: names, registration details, club badges or a favourite design on a rear panel. They are the cheapest way to add personality, and they are easy to replace if your taste changes.
| Style | Coverage | Best For | Typical Price |
|---|---|---|---|
| Pinstripe set | Thin accent lines | Classic motorhomes | $140 to $150 |
| Stripe decal set | Side panel length | Most renovations | $160 to $360 |
| Retro landscape kit | Full side flow | Bold makeovers | $950 |
| Printed wrap | Large flat panels | Statement builds | $390 per side |
Custom Motorhome Graphics: Design, Sizing and Proofing
Custom motorhome graphics start with a measurement, not a design. Measure each panel you want to cover, note where windows, doors, vents and wheel arches interrupt the surface, and send those dimensions through before ordering. Sizing errors cause more returns than design disagreements.

We offer custom sizes and colours across our range, and the process works like this:
- Photograph each side of the vehicle in good light, straight on.
- Measure panel length and height in millimetres, ignoring curves.
- Mark any fittings the graphic must avoid.
- Choose a design direction and a colour that suits the vehicle's paint.
- Request a proof or a mockup before production.
Ask for a proof. A design that looks sharp on a screen can disappear against a dark paint colour or clash with existing trim. A proof shows scale and placement on your actual panel proportions, which is the only reliable way to judge it.
How to Remove Cracked Motorhome Graphics Before You Fit New Ones
Removing cracked motorhome graphics is a three-stage job: soften the adhesive with gentle heat, peel the vinyl back at a shallow angle, then dissolve the leftover residue before cleaning and sealing the panel.
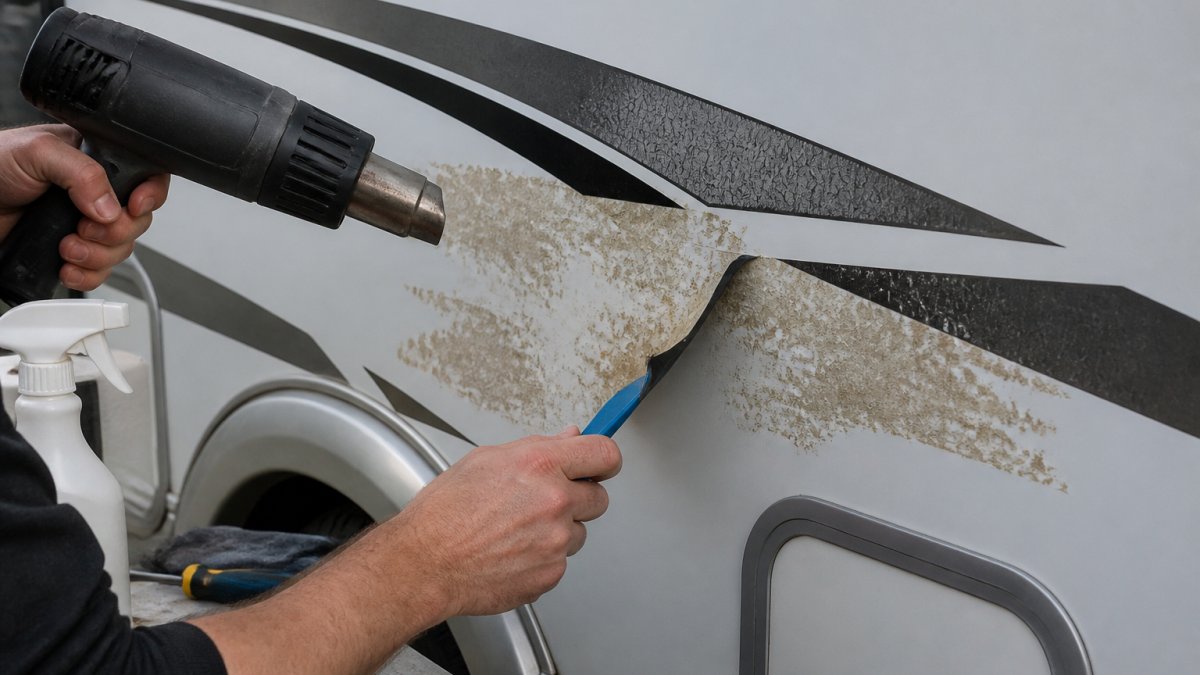
Work in shade, never in direct sun. Heat the decal evenly with a heat gun on a low setting or a hair dryer, holding it roughly 15 to 20 centimetres from the surface and keeping it moving.
Older decals often crack into small pieces and come off in fragments. That is normal. Keep heating and keep the pull angle low.
Once the vinyl is gone, adhesive residue remains. A dedicated adhesive remover, applied to a cloth and left to soften for a minute, lifts it without aggressive scrubbing. Test any solvent on an inconspicuous area first.
Surface Preparation and Panel Placement
Surface preparation decides how long your new graphics last. Wash the panel with a mild detergent, rinse, and let it dry completely. Then wipe the area with an isopropyl alcohol solution to strip oils and wax, and let that flash off.
Check for chalky or oxidised paint. Vinyl bonds poorly to oxidised surfaces, so a light cut and polish before application pays for itself. Any panel with peeling clear coat should be repaired first.
Placement matters as much as prep. Use masking tape to position the graphic dry before you commit. Stand back and check the line against the vehicle's body creases and window lines.
Motorhome Caravan Stripe Decals 1400mm – Australian RV Camper Van Vinyl Graphics →
Apply on a day between roughly 18 and 25 degrees Celsius. Cold vinyl cracks and hot vinyl grabs too fast to reposition.
Motorhome Decal Replacement Cost: What to Budget
Motorhome decal replacement cost depends on coverage, vinyl grade and whether you fit it yourself. In our range, a pinstripe set starts at $140, a two-stripe side set at $160, larger multi-piece stripe kits run from $295 to $360, and a full earth-tone landscape kit sits at $950. A printed wrap is $390 per side.
Budget for these line items:
- Graphics themselves: $140 to $950 depending on coverage
- Removal of old decals: your time, or a few hours of labour if outsourced
- Adhesive remover and cleaning supplies: modest, but buy proper product
- Application tools: squeegee, masking tape, heat gun, alcohol solution
- Optional professional fitting: the largest variable in the budget
The honest comparison is against paint. A full respray costs many times more than a vinyl graphic set and takes the vehicle off the road for days. Vinyl gives you most of the visual improvement for a small fraction of that spend, and you can change it again later without sanding anything.
Motorhome Replacement Decals: Choosing Vinyl Type and Lifespan
Motorhome replacement decals should be specified by vinyl grade, not by how the product photo looks. The grade determines lifespan, colour stability and how the film behaves on a curved panel.
Here is how the grades we stock compare:
- Standard vehicle-grade vinyl: weatherproof and UV resistant, suited to stripe decals and pinstripes. Good for most renovation budgets.
- 5-year vinyl with glossy overlaminate: used on our printed wraps. The overlaminate adds gloss and a protective layer over the print.
- 7-year commercial signwriting grade: used on our 4m stripe set. The longest lifespan in the range and the most fade resistant.
UV protection is the specification that matters most in harsh sun. A graphic without UV-stable film will chalk and fade within a couple of seasons, and no amount of care reverses it. Waterproofing and scratch resistance come from the film and any overlaminate, so check both before ordering.
Gloss versus matte is a styling call. Gloss matches most factory paintwork and hides surface texture. Matte suits satin and flat finishes but shows handling marks more readily.
DIY Installation vs Professional Fitting
DIY installation suits most motorhome graphics if you have a clean, shaded workspace and patience. Professional fitting makes sense for large printed wraps, heavily curved panels, or any job where the graphic cost is high enough that a mistake hurts.
The DIY route works when:
- The graphic is a stripe or pinstripe set on a flat or gently curved panel
- You can work in shade with a temperature in the comfortable range
- You have a squeegee, masking tape and a heat gun
- You are willing to redo a section if it goes wrong
Professional fitting is the better call when:
- You are applying a full printed wrap that needs cutting around windows and doors
- The panels have complex curves, rivets or vents
- The vehicle is a commercial unit where downtime is expensive
- You want a warranty-backed finish
Our Universal Vehicle Racing Stripe Decal Kit is a good first project: computer cut with no background, supplied with transfer tape, and available in three sizes from $45. It gives you a painted-on look without the difficulty of a full panel wrap.
| Factor | DIY | Professional |
|---|---|---|
| Cost | Graphics plus tools | Graphics plus labour |
| Best for | Stripes, pinstripes, small panels | Wraps, curves, commercial fleets |
| Risk | Higher on large graphics | Low, backed by fitter |
| Time | An afternoon | Booked in advance |
Conclusion
The hardest part of a motorhome renovation is not choosing a design. It is the week where the old cracked decals are half off, the panel looks worse than when you started, and you wonder whether to just leave it plain. Push through that stage, because the surface underneath is almost always sound, and the new graphics cover far more than you expect.
We make Australian-made vinyl graphics for motorhomes, caravans and campervans, with custom sizes and colours, premium outdoor vinyl, and designs built for harsh sun and long touring seasons. If you are planning a renovation, measure your panels, pick a style, and order with confidence.
Get started with Mega Sticker Store and give your motorhome the exterior finish the rest of your renovation deserves.
Frequently Asked Questions
How much does it cost to replace motorhome decals?
At Mega Sticker Store, replacement graphics range from $45 for a universal racing stripe kit up to $950 for a full earth-tone landscape decal kit. Mid-range options include 4m stripe sets at $360, custom stripe graphics at $295 and pinstripe decals at $150. A printed Australian landscape wrap is $390 per side. Budget also for removal tools, adhesive remover and a squeegee if you are fitting the graphics yourself rather than paying a signwriter.
How do you remove cracked vinyl graphics from a motorhome?
Warm the decal with a heat gun or hair dryer on a low setting to soften the adhesive, then lift a corner with a plastic scraper and peel back slowly at a shallow angle. Work in sections rather than pulling the whole graphic at once. Once the vinyl is off, soak any adhesive residue with a dedicated adhesive remover, leave it a few minutes, then wipe clean. Wash the panel with a degreaser and let it dry fully before applying replacement decals.
What type of vinyl is best for motorhome exterior graphics?
Look for outdoor-grade or commercial signwriting vinyl rated for five to seven years. The 4m stripe set uses 7-year commercial signwriting grade vinyl, and the large RV stripes use 5-7 year vinyl. Printed wraps such as the Australian landscape design use durable 5-year vinyl with a glossy overlaminate for UV protection. Avoid cheap unbranded vinyl, which fades and cracks quickly under strong sun.
Can you apply new decals over old motorhome graphics?
It is not recommended. New vinyl will telegraph every crack, bubble and edge of the old graphic underneath, and trapped moisture can cause the new decal to lift. Faded or cracked graphics should be removed and the panel cleaned and degreased first. If the old decal is intact and flat, some owners do overlay it, but removal gives a cleaner, longer-lasting result, especially on curved panels where adhesion matters most.
Can you get custom vinyl graphics made to match old motorhome decals?
Yes. Custom motorhome graphics can be produced in custom sizes and colours to suit your vehicle's panels and original styling. Send your vehicle dimensions and any reference photos, and request a proof before production so you can check the design against your paintwork. Made-to-order kits typically need lead time, so order several weeks before a planned trip. Custom colour and sizing requests are handled directly with the supplier.